
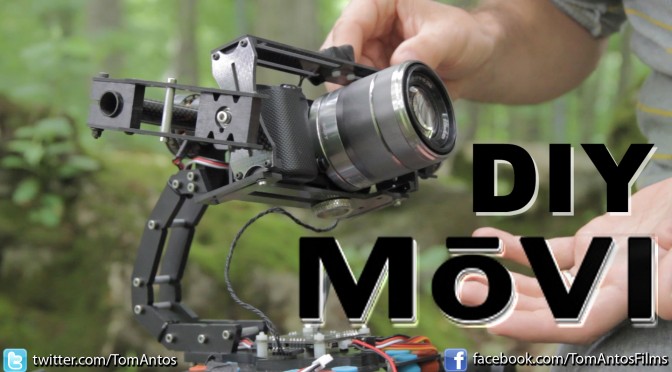
I’m sure you’ve heard of the MōVi. Well, if you can’t afford to buy it, you can maybe build one yourself. Here’s a video about how I did it. Watch it, then read my detailed notes below.
Tutorial 41
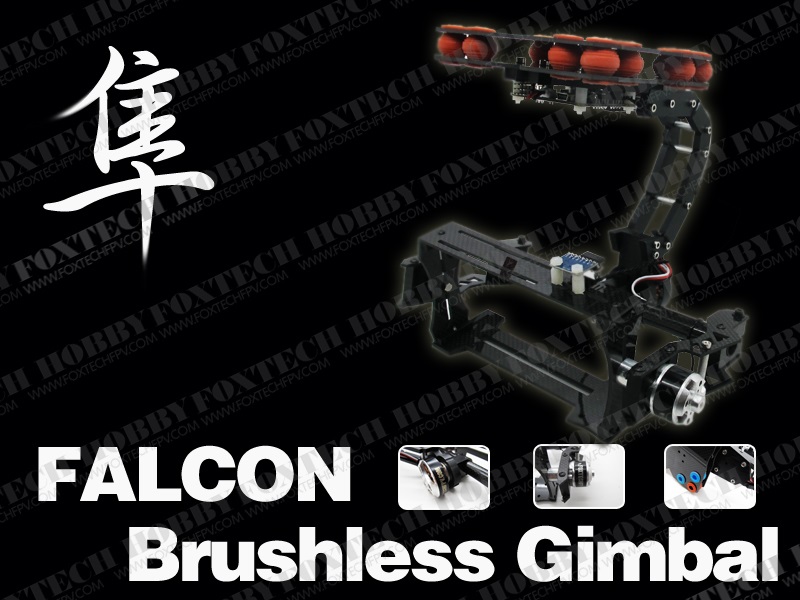
So, the first thing you need to get is the gimbal itself. The best and cheapest one that I found was from a solid Chinese company FoxTechFPV. They specialize in all sorts of RC flying gadgets: multicopters, video transmitters for first person point of view flying, as well as the FALCON GIMBAL. That’s the one I’ve used. You can get it HERE.
Update March 2014: check out my video review of a new 3-axis camera gimbal. It is under $1000 and it produces impressive shots. See for yourself.
After that, you can make your own handle to hold it, or just attach it to a cheap but good shoulder rig like the one I reviewed in this tutorial. If you opt for the latter, you’ll be able to also use it as a stand alone shoulder rig for your camera.
You Can buy the shoulder rig at eBay:
or Amazon
EU/UK Amazon customers can go here
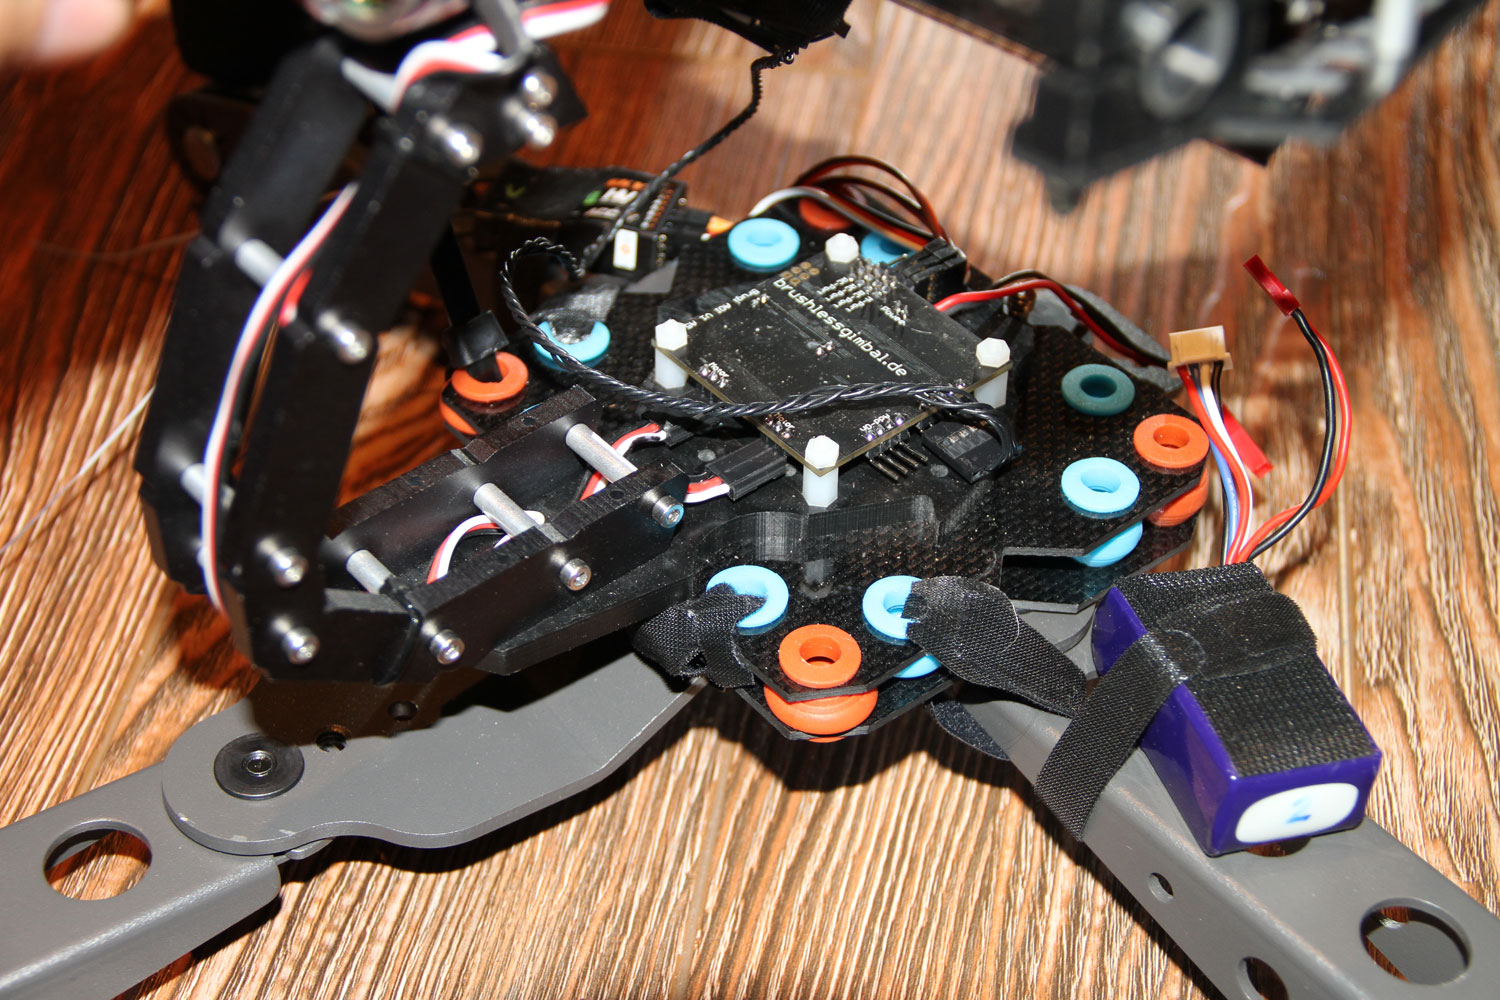
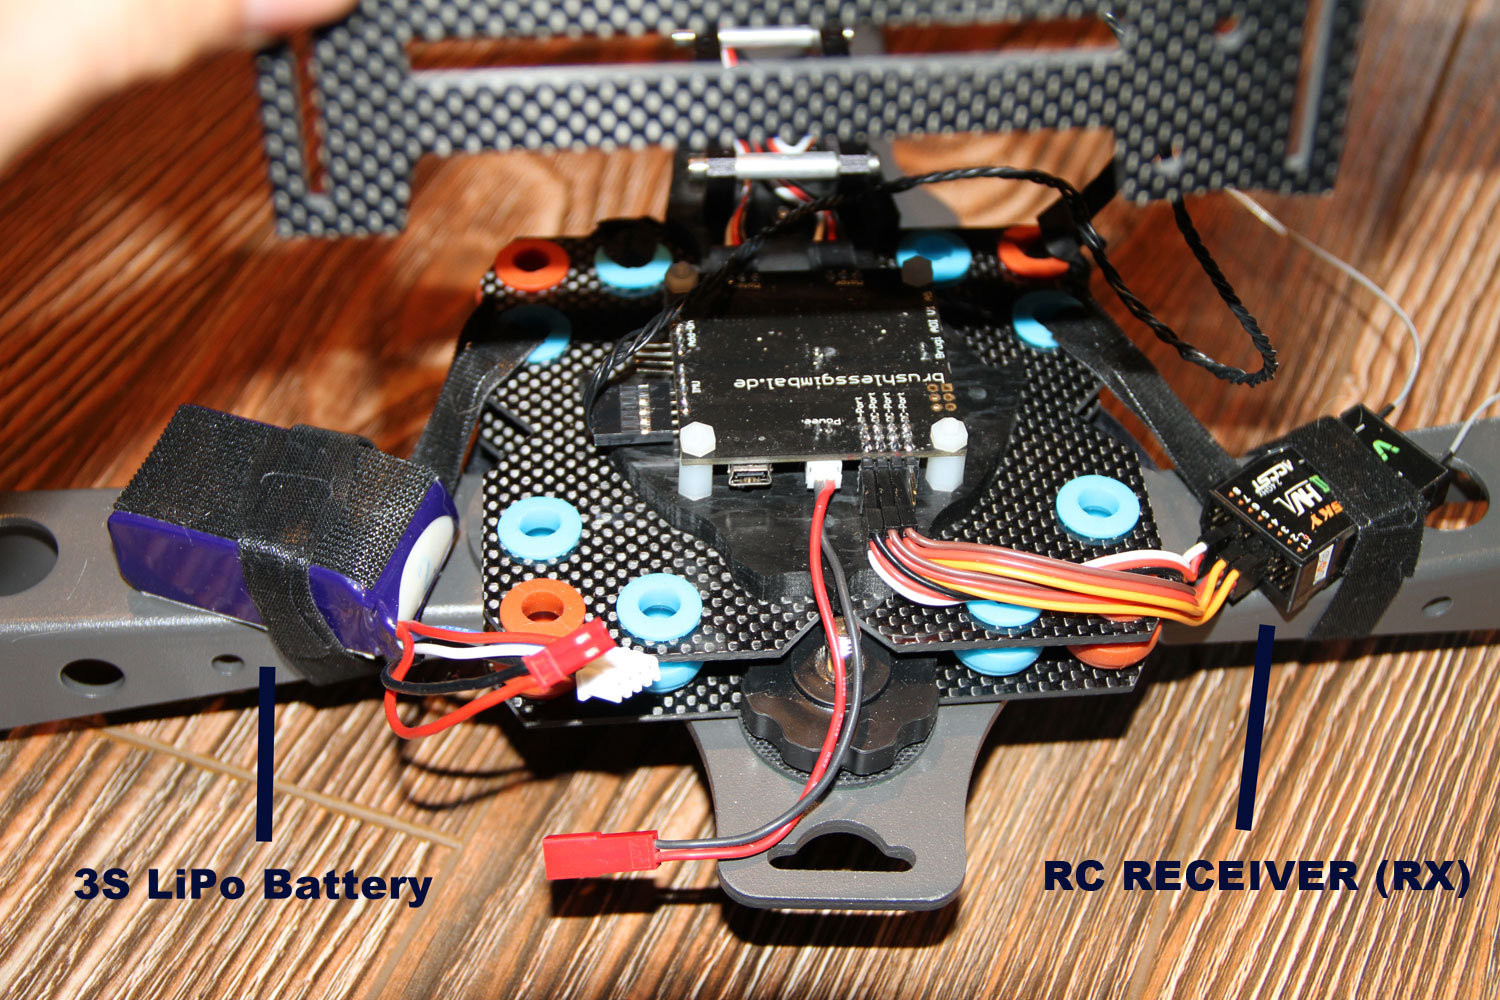
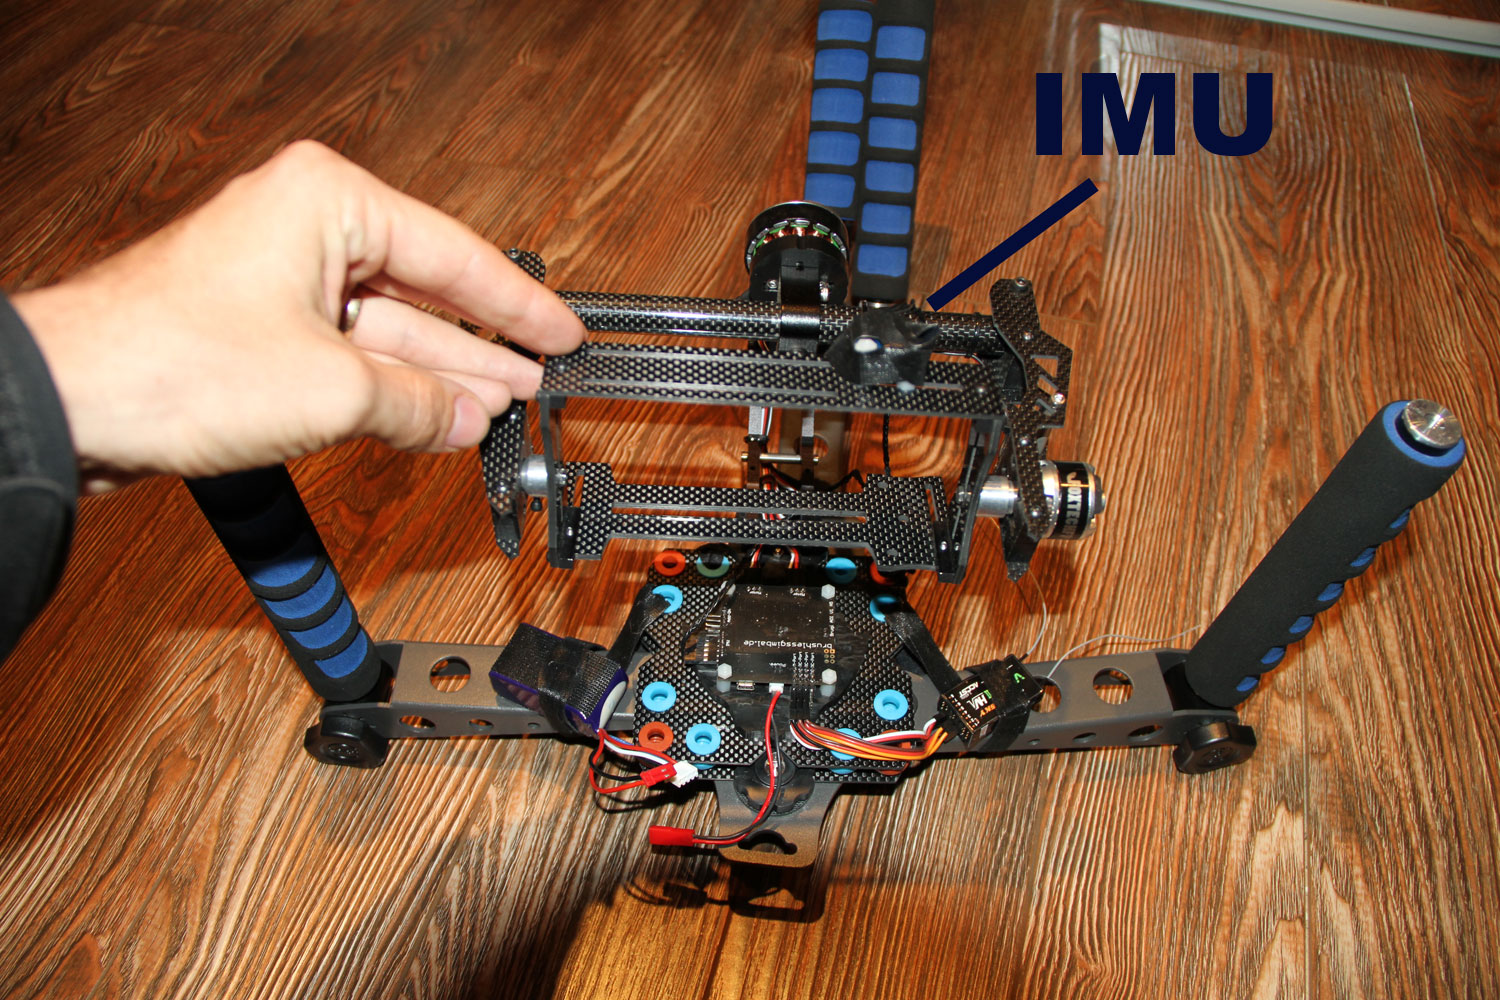
To attach the gimbal to the shoulder rig, I just used some Velcro tape that I bought at Home Depot. This way I can easily take it off and still use my shoulder rig without the gimbal. I also used the Velcro to attach the battery and the RC Receiver (Rx). Just check out the pics below for a more detailed look of my setup.
Another thing you should get (even though the gimbal works without it too) is an RC transmitter/receiver combo. I got a good one that I use for all my other RC gadgets. But it’s way an overkill for this. Plus it’s just too big and bulky. Mine cost only $50 but you can find simple 2 channel transmitters for way less at your local hobby store. You can also buy all sorts of cheap RC transmitters on different websites. My favourite is Hobby King.
Once you’ve connected it all, just follow the instructions for the gimbal on how to adjust the balance. The guys at FoxTechFPV have a lot of great videos on how to do that. Plus, check out their forum page for even more info about the gimbal.
A word of warning – the gimbal sensor or the IMU don’t work well in cold situations. I learned that the hard way while trying to use it on a music video. While shooting at night on a rooftop where the temperatures were around 10ºC/50ºF (so not that cold), the sensor started to act weird and then it just stopped working all together. As soon as I warmed it up again, it worked. After that, I simply covered my IMU with a little Velcro tape. I love that VELCRO! 🙂 Again, check out the pics below for how I did that.
The last tip I can give you is to just figure out what camera you will be using with your rig and then adjust the gain settings in the gimbal software accordingly. I didn’t do it and noticed it sometimes wobbled a bit. After playing around with the settings, I can already see some improvements. If any of you guys is an RC hobby expert and has any other suggestions, then please leave me a comment below. Thanks!


Hey nice work. If you want to get rid off that giant RC transmitter I recommend to use servo tester instead of your receiver. http://www.ebay.com/itm/Multi-Servo-tester-3CH-ECS-speed-controler-tester-Power-F008-/271078382989?pt=US_Radio_Control_Control_Line&hash=item3f1d87dd8d
Thanks for the tip! I already had a few other people message me that servo tester would work better. Will for sure try it in the future, plus I already did a few small tweaks that remove the wobble from the video. Will post an update video soon!
ive got a question….
ive bought a evvgc 3 axis gimbal controller and wanted to know if you need to put some regulator to plug a 3 cell (11.1V 2200 MAH) battery
I can’t help you since I don’t know anything about the evvgc 3 axis gimbal controller. Just check what current it accepts… and then u’ll know if u need to adjust it depending on the battery you’re using.
Is it possible to mount a 60D onto this device? Thanks
I believe so, but first contact the seller of this gimbal for specific details. at http://www.foxtechfpv.com/
I was looking at this and it looks like primary difficulty is going to be controlling where the camera is looking (here you mention that side to side is controlled by your body rotation and pitch and roll by your remote control).
I was thinking a really cool way to control the pitch, roll, and yaw could be with head movement. This could be achieved with a little camera (mounted on your hat for example) that is tracking a background scene. A small computer like a Raspberry PI could do the math and output pitch, roll, and yaw.
Since you sometimes need your head to move to negotiate obstacles without wanting to move the camera, you could create a little lock-out button, i.e. the gimbals only respond to the head motion when you’ve engaged a trigger with your hand.
you can actually adapt the fatshrk headtrack module to it its way easier than having a small computer!(still was a great idea) they sell them in
http://www.hobbyking.com in the section of fpv
Seems the Foxtech Falcon Brushless Gimbal is all sold out. 🙁
Yup, I advertised it for them and I heard they got a crazy amount of sales from it in one day. Seems a lot of people are building DIY camera gimbals. Just email them and ask them when they will have more in stock.
I’ve built a small circuit board that allows you to directly connect a Wii Nunchuck to a pair of servos. You could replace your RC tx/rx with this board and use the nunchuck to control the pan/tilt.
If you’re interested in the design files send me an email.
-Daniel
I’d be interested if you’re still offering Daniel.
I would love to see your nunchuck design. I just got my gimbel up and running.
My email address is msinsm@mac.com.
Thanks much.
Thanks for this post. It’s strange; I’ve seen some of Tom’s work just pvlsiaesy browsing the internet. It’s generally high-quality stuff.I’m a bit hesitant to put a camera on something that’s only ratcheted to the door, though it does look fairly secure.
Thanks for sharing this how to do it for less price than the MōVi, less than $ 1.000 against $15.000 just make my day 🙂
Hi,
Are there any issues with using image stabilised lenses? I’d be looking to possibly use this with a GH2 (with a variety of lenses including the 14-140mm lens which has OIS). How does it handle front-heavy DLSRs?
-Evan
I have only used it with the Sony NEX5 so far so I can’t answer your question. If I get a chance to test it out with a GH2 I will post the results on here.
That’s a good question. I have a GH3 and a voightlander 17.5 which would be front heavy. I would like to buy one from you (I’m not a do it yourself guy) lol.
Hi Tom,
Thanks for your notes.
Pls also advise on what parts would be needed to have a similar gimbal set, but capable of carrying heavier camera sets totaling 10 pounds with lenses,
Thanks again,
Oli
Hi Tom,
thanks for sharing this. Is there any update yet on improved performance after software tweaking? there are many others on ebay, some stating higher weight capacity, some cheaper etc. Any idea what the difference is between yours and ones such as this:
http://www.ebay.com/itm/3-Axis-Camera-Brushless-Gimbal-W-Motors-handle-gimbal-Stabilized-Mount-Movie-/130953369463?pt=Radio_Control_Parts_Accessories&hash=item1e7d6dd777
or is yours more a turn-key solution?
Any idea what the difference is between yours and ones such as this:
http://www.ebay.com/itm/3-Axis-Camera-Brushless-Gimbal-W-Motors-handle-gimbal-Stabilized-Mount-Movie-/130953369463?pt=Radio_Control_Parts_Accessories&hash=item1e7d6dd777That looks like a well designed 3 axis gimbal.. Problem is that it’s without the control board. U have to buy that separately and assamble it, and program the board. That’s not easy.
Ah ok thanks a lot. So that means best to steer clear as I’m not much of a programmer! Have you made any progress yet with your falcon gimble? I have emailed them but had no reply. They must have been busy after so many tens of thousands of people saw your video! 🙂 Hope that it can get even better, i hope to get a brushless gimble for my black magic pocket camera. The relentless defy gimble looks good but still a bit pricey…
No problem. I was adjusting the flacon gimbal further and was getting better results, but before I managed to get perfect results I did some of the wiring wrong and burned the control board. Or at least it appears that I have done so, because I seen a little smoke come from one of the wires I soldiered to the board. 🙁 Now Im waiting for a replacement control board so I can finish it. This technology is still fairly new so right now it requires a lot of technical know age and know-how. Even the MoVI is not that easy to use. I remember seeing it used at a trade-show and when putting on a different size lens it took a bit of time to adjust the balance of the rig and then some tweaking of the settings to get the control board gain settings all spot on. I think right now if u really need fluid shots, then I recommend buying a steadicam and learning to use that. In the near future. Maybe even a few months from now it will all change and Im sure someone will come up with a much cheaper and stronger motors that can handle any camera without the need to balance the rig perfectly.
Ok great thanks, that’s an important reality check- that even the high end movi stuff is not quite as pick-up-and-go as advertised. If a lens change requires connecting to skynet, re-programming of the flux-capacitor and supplying it with more plutonium, then yeah, I might as well use a blackbird or other stabiliser that just works.
Wonder why there has been no mention of the workflow on any of the developers sites. It gives people the wrong impression if they don’t reveal the cumbersome side of their product which is advertised as simple and easy to use.
You could use two servo testers instead of an RC Tx Rx for controlling roll/pitch (search on hobbyking for “servo tester”).
Or if you want to go fancy, you could add an arduino with buttons for up, down, fast up, fast down, etc. Would love to see this working!
I want this yesterday, so much cheaper then movi
Hi Tom, thanks for sharing the great info.
I have a question: Could you mount the gimbal on the end of a pole, thus giving you a controllable and super light-weight crane/jib? You could stick the pole out to places and heights you can’t normally reach and if you had a field monitor you could adjust using the remote control. Do you see any problems with this setup? I’d love to see you test it out.
Thanks again, Paul.
Paul it’s funny that you brought this up because in fact that was one of the reasons why I ever got into working on these gimbals. Because I wanted to create a cheap but super light and easy to setup crane with a full tilt and pan capabilities. It is in fact something you can do. Im planning on doing a video about this in the future once I get all the little quirks with it worked out.
Great stuff. I look forward to it.
I’d also love to see how well the gimbal works with larger dslr cameras like your 7D or a 5D.
Why visitors still make use of to read news papers when in this technological
world all is accessible on web?
I’m working on building something like this for myself and am trying to save funds by repurposing existing on-hand materials.
1. Would a hard drive spindle motor work as a gimbal motor? Both are phased brushless DC motors.
2. Would a Raspberry Pi board have the requisite computing power to act as the controller board?
The motors might work but I don’t know about the Raspberry Pi board… for one they might not have the needed connections for the 12volt battery and out for the motors..
Also you need 3 axis gyros on the board so that is another reason why even if the Pi board could work it would have to be modified a lot.
I think it would be cheaper to just buy the original SimpleBGC controllers board with the sensors etc.
You can find online stores of it here: http://www.basecamelectronics.com/wheretobuy/
You can buy the whole board with cables and sensors for as cheap as $150USD