

If you’ve been follwing me for a while then you know what I always say; “The camera and all the gear in the world will not make horrible production design look good”. What is production design? It’s everything pretty much that you see in the final shot. So your costumes, lighting design, color scheme and overall your locations or sets.
Sometimes of course it is really hard to get great production design if you are an indy filmmaker who is broke and can barely afford a camera to shoot with. In that case what can you do? Well of course first you want to ask, beg and plead with people to let you borrow their props, clothes and locations to use in your film. That’s why I still do when I am doing a small self financed project. Instead of spending money on a location I’d rather ask first and if I can get it for free then I’d rather use that money on better food for my actors and crew. This is not always possible of course, specially when you are talking about locations that are owned and operated by the city or any government institutions. In many cities you can get free exterior location permits but you still will need to get production insurance which can be expensive. Now if you want to shoot inside then most owners will ask for insurance and location rental fees. But sometimes even that is not enough. For example you can’t shut down a busy metro station just so you can shoot your film. On a big budget the production can just simply replicate the entire location on a sound stage. Guess what, if you are on a tight budget you can do something similar for a lot less by building partial sets out of cardboard and then filling in the rest with green screen where you can place footage or photos of the real locations.
This is exactly what the filmmakers behind the short film “Deep Dish Apocalypse” did. David and James Codeglia, director and cinematographer of the short film decided this was the easiest and most cost effective way to do their project. The story takes place on an abandoned subway station platform during a zombie apocalypse.
Here is an awesome behind the scenes look at their production.
Building a standing set out of wood was considered, but ultimately ruled out due to logistics and limited resources. James measures, “Wood is expensive. It’s hard to haul. It’s hard to get rid of afterward. It’s also still cost prohibitive. It’s like, how do we rent fewer trucks?” David dives in, “We did a thing called Our Robocop Remake. We made a giant walking cardboard replica of the villain robot, Ed 209. Working with cardboard there, we realized how flexible it was – how easy it was to build with it. It’s easy to cut, bend, shape, fold, and glue together with hot glue. So it’s fast, easy, ready when you need it to be. And we learned you can paint it, and it’s all you need. We thought, we made it look like cardboard on purpose. I bet we could make it look like not cardboard if we wanted to.” James recalls, “The set around him was a good 3/4 of a cyc stage of 8 feet tall cardboard walls, and all of that set construction fit in the back of a van. It lays flat. And it was really affordable.”
Since they did have to resort to doing some green screen set replacement you might be wondering why not just do the whole thing as a green screen? James’ answer is “Visual effects are essential, but the more you can reduce them, the better. The best thing our experience informed was when to use a visual effect and when not to.” Obviously doing the VFX is time consuming and so the more of that work in post you can save the faster and cheaper the final film will be. Also many filmmakers will agree that for moments where actors need to interact with the set directly it is best to have at least that section there for real. It makes the acting more convincing but also it sets the whole scene in reality specially when you are going to be mixing in green screen shots. Sometimes those little moments where an actor touches a wall or leans against it just doesn’t look as good as a green screen effect. There a lot of subtle things like reflections, shadows etc that happen when you have an actor interact with a real physical object. So the filmmakers resolved to building a cheap and fast cardboard set. Building a life-size 360 cardboard subway station would have been overwhelming, and more importantly, wasn’t necessary for the story to be told.
James elaborates, “We knew from the script, a lot of this is conversation, cross-coverage, you wouldn’t have to build much. You could do a couple of visual effects shots to sell it. The set could be out of focus in the background.”
David chimes in, “We knew we couldn’t build an entire subway. So, the question became, what do we need? Remember all you’re trying to do is capture it on screen, what’s the least we need. If you don’t need it, get rid of it. All about clarity. And to find that answer, we needed to do a location scout. We needed to decide where are we. And if we are using a green screen and replacing it with a real background, we need to know what is the space, so we can copy that, so it feels like it gels.”
James and David went on a detailed location scout. Armed with Artemis’ Pro View Finder on an iPhone, a high-resolution SLR camera, and a measuring tape, they blocked out the entire short on location. They walked through the script, blocking out the action, and choosing camera angles. David remembers, “We pretended we were the actors, and if we look this way for these moments, and this way for these moments – this we can build, this we can’t.”
They also used another real-life element to enhance the realism of the green-screen set. James points out, “We knew the pillar would be in focus, so it couldn’t be cardboard. IT had to have a concrete texture. So we had production designer to make a concrete replica out of styrofoam.”
They knew from their blocking that the actors would need to interact with the pillar during filming. Capturing the concrete pillar in-camera allowed them to have something tangible on set for the actors to use to ground themselves in the space. They also would be able to capture shadow interaction on the pillar itself. This believable, real interaction with the pillar further convinces the audience that the entire production was real.
Their expenses totaled approximately $300 worth of cardboard, paint, razors, hot glue, and materials needed for the production designer to construct the faux concrete pillar.
For the cardboard wall, they would be building everything to scale, slightly miniaturized. James recalls that to cut down on time in the studio space where they would film, they “built as much as we could at home, and then brought it to set to finish.”
But painting large flats of cardboard at this size presents its own challenges. David recalls a wrinkle in the plan. “We painted with rollers on big flat pieces of cardboard, and the paint dried, and the cardboard started to curl. So we spent a lot of time reinforcing the cardboard to make it stay flat.” With a one-day build, they had to come up with creative ways to accomplish some trickier aspects of the set they’d designed.
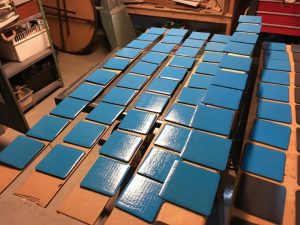
The tiles created for the accent line on the subway wall were also a special challenge because they needed to make them 3-D. Rather than create a wall with a depressed section, they used ingenuity. They painted a section of the tiles in shadow. David calls it “2 and a half D. You create as much as you can in 2D, and then paint 3D on top of that.”
When reflecting on the experience, James and David were quick to point out the importance of pre-planning for an extensive DIY project like this. David synthesizes, “If a picture is worth a thousand words, a rehearsal is worth a million.” He postulates, “In rehearsal, you’re making all of your mistakes for free.” He encourages filmmakers no matter the project to put an emphasis on fixing issues during pre-production.
David also encourages filmmakers to put the emphasis on what is real, not the visual effects. He remarks, “if you can shoot it for real, shoot it for real. If you can’t do that, what’s the next most real thing. Not real is the last result.”
Their final words of wisdom for fellow filmmakers is short and to the point. David encourages, “Get your hands dirty. Have fun.” James recommends, “Be flexible.”
Here you can watch the final finished film
Great work guys, just brill 😉